Back to Learning Center
    Polishing Techniques

    Choosing the Right Grit: A Complete Progression Guide

    Love Agates TeamDec 28, 202512 min read
    Choosing the Right Grit: A Complete Progression Guide

    One of the most common challenges in lapidary work isn't cutting the stone — it's knowing which grit to use, when to move on, and why the finish isn't quite there yet. Mastering grit progression is what separates frustration from flow and dull stones from glowing ones.

    Whether you're tumbling rough, shaping on a wet belt sander, refining on reciprocating laps, or cabbing on a traditional machine, the principles are the same: each grit removes the scratches of the previous grit — nothing more, nothing less.

    Let's break it down, step by step, so you can work smarter, not harder.


    The Golden Rules of Grit Progression

    Before we dive into each tool, keep these universal truths in mind:

  1. Never skip grits (unless you enjoy chasing scratches later)
  2. Don't move on too early — if scratches remain, they will show up at polish
  3. Cleanliness matters — cross-contamination can undo hours of work
  4. Let the grit do the work — pressure causes uneven scratches and flat spots
  5. Now let's explore how this plays out across different lapidary methods.


    1. Grit Progression for Rock Tumbling

    Rock tumbling is slow, methodical, and incredibly rewarding when done right.

    Typical Rotary Tumbler Progression

    Coarse Grind (Shaping)

  6. 60/90 grit (or 80 grit)
  7. Purpose: Shape the stone, remove pits and fractures
  8. Time: 7–14 days (sometimes longer)
  9. Do not move on until stones are evenly shaped and matte
  10. Medium Grind

  11. 120/220 grit
  12. Purpose: Remove coarse grind scratches
  13. Time: 7–10 days
  14. Stones should feel smoother but still matte
  15. Pre-Polish

  16. 500 grit
  17. Purpose: Prepare the surface for polish
  18. Time: 5–7 days
  19. Stones should feel silky smooth
  20. Polish

  21. Aluminum Oxide or Cerium Oxide
  22. Purpose: Create shine
  23. Time: 7–10 days
  24. Results depend heavily on how well earlier steps were done
  25. Optional Burnish

  26. Borax or ivory soap
  27. 2–24 hours
  28. Enhances clarity and removes residue
  29. Love Agates Tip: Most tumbling failures happen in the coarse stage. Patience here pays off more than any polish ever will.

    2. Wet Belt Sanders & Belt Grit Progression

    Wet belt sanders are power tools — fast, efficient, and unforgiving if rushed.

    Common Belt Progression

    Shaping

  30. 80 or 100 grit
  31. Removes saw marks and rough shaping
  32. Be careful: these grits remove material fast
  33. Refining Shape

  34. 180–220 grit
  35. Smooths deep scratches
  36. Finalizes contours
  37. Pre-Smoothing

  38. 400 grit
  39. Removes visible scratches
  40. Surface begins to reflect light
  41. Pre-Polish

  42. 600–800 grit
  43. Optional but highly recommended for harder stones
  44. Polish Belts

  45. 1,200 – 3,000 grit
  46. Or resin belts, cork belts with compound
  47. Love Agates Tip: If you can see scratches when the stone is wet, they're still there. Don't advance.

    3. Reciprocating Laps (Flat Laps & Slab Finishing)

    Reciprocating laps excel at producing flat, even surfaces — perfect for slabs and faces.

    Typical Grit Progression

    Grinding

  48. 80 or 100 grit
  49. Removes saw marks and uneven surfaces
  50. Scratch Removal

  51. 180–220 grit
  52. Major refinement stage
  53. Smoothing

  54. 320–400 grit
  55. Stone should look uniformly matte
  56. Pre-Polish

  57. 600–800 grit
  58. Scratches should be nearly invisible
  59. Fine Pre-Polish

  60. 1,200 – 3,000 grit
  61. Optional but ideal for agates and jaspers
  62. Polish

  63. Cerium Oxide, Tin Oxide, or Aluminum Oxide
  64. Felt, leather, or resin-backed lap
  65. Love Agates Tip: Reciprocating laps reward patience. Let the lap do the work — pressure causes uneven polish.

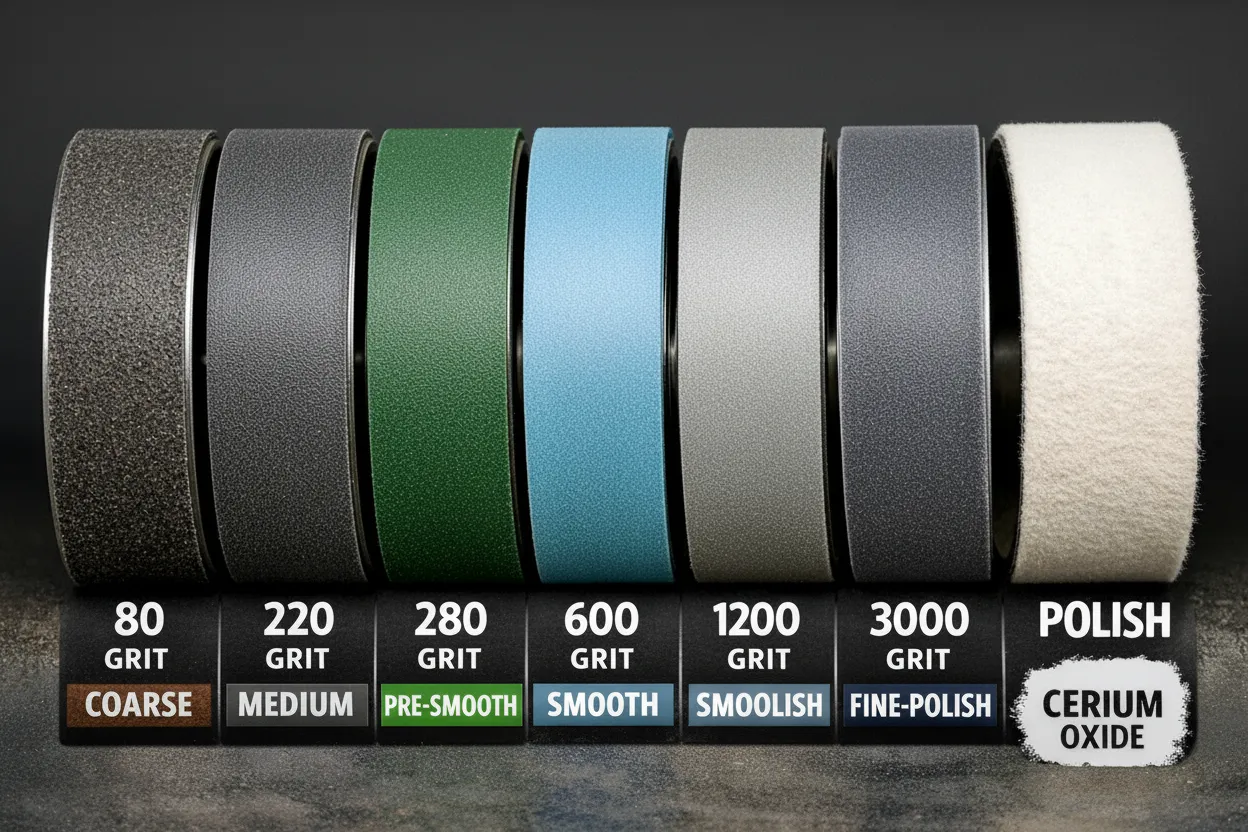
    4. Cabbing Machines (Wheels & Grit Progression)

    Cabbing machines are where artistry meets precision. A disciplined grit progression here is non-negotiable.

    Standard Cab Wheel Progression

    Rough Shaping

  66. 80–100 grit hard wheel
  67. Establishes dome and outline
  68. Refining Shape

  69. 180–220 grit
  70. Removes deep scratches
  71. Pre-Smoothing

  72. 280–320 grit
  73. Dome becomes smooth and consistent
  74. Smoothing

  75. 600 grit
  76. Scratches should no longer be visible to the eye
  77. Pre-Polish

  78. 1,200 grit
  79. Stone begins to glow
  80. Fine Pre-Polish

  81. 3,000 grit
  82. Sets the stage for a flawless polish
  83. Polish

  84. Cerium Oxide (agates)
  85. Tin Oxide (quartz)
  86. Diamond (hard stones)
  87. Love Agates Tip: If polish isn't popping, go back to 600 or 1,200. Polish only reveals what's already there.

    Final Thoughts from Love Agates

    Choosing the right grit isn't about speed — it's about respecting the process. Every step builds on the one before it, and every shortcut shows up at the end.

    When in doubt:

  88. Slow down
  89. Step back one grit
  90. Trust your eyes and fingertips
  91. Stone rewards patience. And when you get the progression right, the shine isn't just good — it's unforgettable.

    Happy cutting!

    Have Questions?

    Our team is here to help! Call or text us anytime.

    (616) 801-4117

    Ready to Start Polishing?

    Check out our professional polishing services or browse our collection of beautiful agates.

    Stay Updated

    Subscribe to our newsletter for the latest tutorials, tips, and exclusive content.